Friday 13 May 2016

View Criteria

ADF : View Criteria complex code snippets


View Criteria is a declarative representation of View Object where clause. View Criteria contain a criteria row that itself contains attributes/items that the where clause constructs.


vo = this.getEmpVO();

//To get all the view criterias currently applied on a VO

String[] criterias =  vo.getViewCriteriaManager().getApplyViewCriteriaNames();


//To see all the applied view criterias on a VO

        String[] criterias =  vo.getViewCriteriaManager().getApplyViewCriteriaNames();
        if (Tcriterias != null) {
            for (String vcName : criterias) {
                System.out.println("ViewCriteria :" + vcName);
            }
        }


//To unapply a view criterias on a VO which is currently applied.

String[] criterias =  vo.getViewCriteriaManager().getApplyViewCriteriaNames();
        if (Tcriterias != null) {
            for (String vcName : criterias) {
               vo.getViewCriteriaManager().removeApplyViewCriteriaName(vcName);
            }
        }


//To see all the view criteria items inside a view criteria row

List list = vc.getRows(); //(vc is a view criteria)

Iterator iter1 = list.iterator();
while (iter1.hasNext()) {
      

                   ViewCriteriaRow row = (ViewCriteriaRow)iter1.next();

                   row.getCriteriaItem("EmpId");
                   row.getCriteriaItem("EmpName").getValue();

                   List vcitems = row.getCriteriaItems();
                  Iterator itemiter = vcitems.iterator();

                 while (itemiter.hasNext()) {
                             
                   ViewCriteriaItem vcitem = (ViewCriteriaItem)itemiter.next();
                   System.out.println("vcitemname in vcrow:"+vcitem.getName());
                   System.out.println("vcitemvalue in vcrow:"+vcitem.getValue());
                  
         }

}

//Add the row to the existing Criteria
vc.addElement(criteriaRow);

Wednesday 11 May 2016

Conditional Render in ADF Faces

ADF : Conditional Render in ADF Faces/ Manually creating ADF Table display

Use case :

The Employee of a company fills an online form of resigning reason before leaving the organization.
All these comments/reason submitted by various employees who left the organization will be saved in a separate DB table Job History.

Now the list of employees with the feedback  in the UI looks like this


Note: I am constructing these information as a table format without using ADF Table . The reason is to explain the scenario with more of real time case.

To achieve this we can use af:gridrow that can loop over the rows that the iterator has.

<af:iterator value="#{bindings.JobHistory.collectionModel}"    var="row" id="it2"   >
           //Code to loop over the rows
         <af:gridRow>
        <af:gridCell>

        </af:gridCell>
       </af:gridRow>
<af:iterator/>

It just looks like the old jsp code where in the table TR and TD loops over a collection of data.
we generally fix the cell property of the row to fixed to have the limited alignment of the table in the page. The space between each row should be dynamic so that the text in the cells would not get overlapped.

something like this will makes sense

<af:iterator value="#{bindings.JobHistory.collectionModel}"    var="row" id="it2"   >
<af:gridRow id="gr3"height="#{row.comments gt 100 ? '40px' : '20px'}">
 <af:gridCell marginStart="10px" width="100px" id="gc7"       valign="stretch" halign="stretch">
              <af:outputText value="#{row.Name}" id="ot8" noWrap="false"/>
            </af:gridCell>
            <af:gridCell marginStart="10px" id="gc9" width="250px"   valign="stretch" halign="stretch">
              <af:outputText value="#{row.comments}" id="ot10"     inlineStyle="word-wrap:break-word" noWrap="false"/>
            </af:gridCell>
 </af:gridRow>

Also few more EL expressions for the conditional rendering of the ADF Faces components

<af:outputText value="#{pageFlowScope.data.request eq 'YES' and pageFlowScope.data.response eq 'N' ? 'DONE': 'COMPLETED'}"  id="ot3"/>

 <af:outputText value="#{str}" id="ot1" rendered="#{requestContext.flag=='YES'}" />

<af:commandLink id="ci2"     rendered="#{row.flag == 'Y' }"  />

Monday 9 May 2016

How to get input values in Managed bean

ADF : How to get input values in Managed bean

                 
Use case :

When I click a button, I want the button to call a method in a java bean and access the value of an input text fields  from ADF Faces pages .

There are many solutions available . This one is basic and easy approach

Solution : 

you can do this by creating binding for each component in a managed/backing bean so that bean will have getter/setter property created for you . Add a button in the page that will have the action listener method to the same bean where you have created bindings for the input components and you can access the values using this.getId().getValue() .

 <b>in Jsff :</b>

 <af:inputText label="Id" id="it1" binding="#{pageFlowScope.SourceFile1.id}"/>
        
 <b>in Bean</b>


JAVA CODE:-


private RichInputText id;

 public void setId(RichInputText id) {
this.id = id;
 }

 public RichInputText getId() {
 return id;
  }
       
  public void onClickSubmit(ActionEvent actionEvent) {
  System.out.println(this.getId().getValue().toString());
  }


Friday 6 May 2016

Access ADF Bindings from Managed Bean

Access ADF Bindings from Managed Bean

ADF enables bindings through Oracle ADF Model layer. whenever ADF view layer is created JDeveloper creates data bound client and thus enable the bridge between model and view components to access data .In some cases we may want to access page bindings Programatically from managed bean . Lets see how it can be done.

Look at the screen shot of the page bindings section of a jsff page.


When u drag and drop employee data control on to the page, Bindings section will contain the data control instance and executable section contains Employee Iterator .

Now lets see how we can access table bindings from Managed Bean . The Code to access.

        DCBindingContainer bindings2 = (DCBindingContainer)BindingContext.getCurrent().getCurrentBindingsEntry();
              
        JUCtrlHierBinding obj = (JUCtrlHierBinding)bindings2.findCtrlBinding("EmployeesEOView1");
        ViewObject vo= obj.getViewObject();
        
        //some operations on it
       
        vo.setNamedWhereClauseParam("BindEmployeeId",101);
        vo.executeQuery();


The same way we can get Iterator bindings too ..

     DCBindingContainer bindings =(DCBindingContainer)BindingContext.getCurrent().getCurrentBindingsEntry();
              
        DCIteratorBinding roleIter = bindings.findIteratorBinding("EmployeesEOView1Iterator");

        ViewObject obj = roleIter.getViewObject();

Execution of Operation binding

BindingContainer bindings = BindingContext.getCurrent().getCurrentBindingsEntry();
        OperationBinding operationBinding = bindings.getOperationBinding("CreateInsert");
        Object result = operationBinding.execute();
       
        //Custom Method
        BindingContainer bindings1 = BindingContext.getCurrent().getCurrentBindingsEntry();
        OperationBinding method = bindings1.getOperationBinding("methodBindingId");
        Map args = method .getParamsMap();
        args.put(“argument1”, argument1Value);
        method .execute();


Programmatic access to View Accessor

ADF : Programmatic access to View Accessor / Dependent LOV

View Accessor is often used to bring List of Values . In simple way , it is used to access a view object from another view object . why in the world should i need to access the view accessor programmatically when ADF View object has the privilege to handle it automatically.. well , thats a point.. There we have a use case //

In general,dependent LOV based on another attribute gets its value by executing view accessor.suppose i have an attribute whose view accessor is defined but the value which is required to be passed comes from various other action like previous page input. There is no view link between two view objects,no relationship .so its completely two independent view objects, but LOV in VO2 depends on VO1 input ..


In Vo2RowImpl :

//VA defined

 public RowSet getMoney() {
        return (RowSet)getAttributeInternal(MONEY);
    }

//custom method
public Object executeViewAccessor(String val) {
      RowSet rs=(RowSet)getAttributeInternal(MONEY);
      rs.setNamedWhereClauseParam("str", str);
      rs.executeQuery();        
      return rs;
    }

//Code to invoke the VA from AmImpl class. AM method is the bridge between two taskflow to pass parameters since we added TF2 as region in main TF. you should add the below AmImpl method as method action before PAGE 2 in TF2

AmImpl Method :

public void executeAction(String str) {
     
        ViewObjectImpl vo = this.getVo2();
        Row row = vo.createRow();
        vo.insertRow(row);
        VO2RowImpl rImpl = (VO2RowImpl )vo.getCurrentRow();
        rImpl.executeViewAccessor(str);

    }

Now you have executed the View accessor of Money VO and your attribute in VO2 containing the LOV prepared based on the input being passed.

Note : There could be certainly many ways to achieve this functionality. This is one of the use case to explain ..

Thursday 5 May 2016

Task Flows

ADF task flows provide a modular approach for defining control flow in an application. Instead of representing an application as a single large JSF page flow, you can break it up into a collection of reusable task flows. Each task flow contains a portion of the application's navigational graph. The nodes in the task flows are activities. An activity node represents a simple logical operation such as displaying a page, executing application logic, or calling another task flow. The transactions between the activities are called control flow cases.
shows two view activities called Create and Confirm. These view activities are similar to page nodes within a JSF page flow.

Figure :- ADF Task Flow
Simple ADF Task Flow.
Task flows can invoke managed beans.

About Unbounded Task Flows

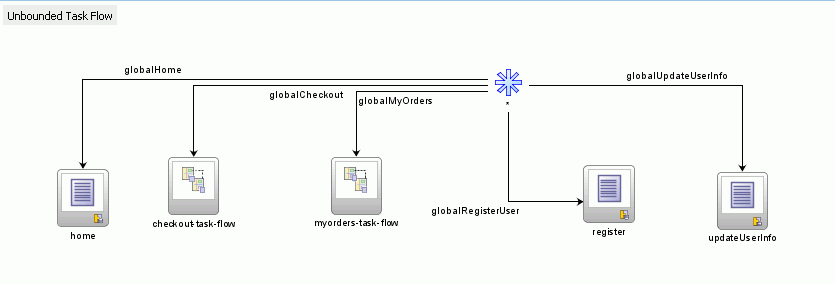
A Fusion web application always contains an ADF unbounded task flow, which contains the entry point or points to the application. An entry point is a view activity that can be directly requested by a browser. A Fusion web application only has one unbounded task flow. By default, the source file for the unbounded task flow is the adfc-config.xml file. Although you can create additional source files for unbounded task flows, the application combines all source files at runtime into the adfc-config.xml file. Figure displays the diagram for the unbounded task flow from the Fusion Order Demo Application. This task flow contains a number of view activities that are all entry points to the application.
Figure
Unbounded Task Flow in Fusion Order Demo Application
Unbounded Task Flow in Fusion Order Demo
You typically use the unbounded task flow instead of a bounded task flow if:
  • You want to take advantage of ADF Controller features not offered by bounded task flows, such as bookmarkable view activities.
  • The task flow will not be called by another task flow.
  • The application has multiple points of entry. In Figure, the task flow can be entered through any of the pages represented by the view activity icons on the unbounded task flows.

The unbounded task flow cannot declaratively specify parameters. In addition, it cannot contain a default activity, an activity designated as the first to run in the unbounded task flow. This is because the unbounded task flow does not have a single point of entry. To perform any of these requires a bounded task flow.
In order to take advantage of completely declarative ADF Controller transaction and reentry support, use a bounded task flow rather than the unbounded task flow.

18.1.2 About Bounded Task Flows

An ADF bounded task flow is used to encapsulate a reusable portion of an application. A bounded task flow is similar to a Java method in that it:
  • Has a single entry point
  • May accept input parameters
  • May generate return values
  • Has its own collection of activities and control flow rules
  • Has its own memory scope and managed bean lifespan (a page flow scope instance)
The checkout-task-flow activity in Figure is a call to a bounded task flow. The unbounded task flow can call a bounded task flow, but cannot be called by another task flow. A bounded task flow can call another bounded task flow, which can call another and so on. There is no limit to the depth of the calls.
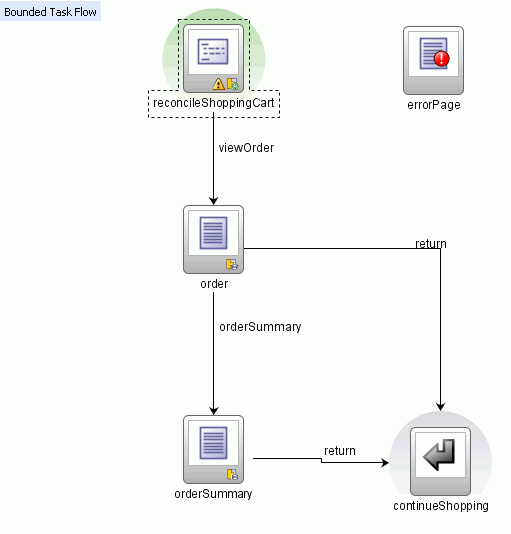
The checkout process is created as a separate bounded task flow, as shown in Figure 
Figure  Checkout Bounded Task Flow in Fusion Order Demo Application
Checkout bounded task flow
The reasons for creating the checkout-task-flow activity as a called bounded task flow are:
  • The bounded task flow always specifies a default activity, a single point of entry that must execute immediately upon entry of the bounded task flow.
    In the checkout task flow, the activity labeled reconcileShoppingCart invokes a method that returns a list of items that an anonymous user (one who has not yet logged in to the application) may have chosen to purchase. Any items chosen before authentication are included in the shopping cart after the user has logged in. Because it is the default activity, the method is always invoked before the shopping cart order page displays.
  • checkout-task-flow is reusable. For example, it can be included in other applications requiring an item checkout process. The bounded task flow can also be reused within the same application.
  • Any managed beans you decide to use within checkout-task-flow can be specified in page flow scope, so are isolated from the rest of the application. These managed beans (with page flow scope) are automatically released when the task flow completes.


Create a Bounded Task Flow:-
 
With the TaskFlow application loaded in JDeveloper, you create a bounded task flow diagram including views, and returns. To do this, perform the following steps:
    ADF task flows provide a modular approach for defining control flow in an application. 

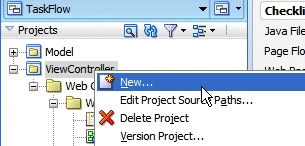
  1. In the Application Navigator, right click the ViewController node and select New from context menu.

    An ADF bounded task flow is used to encapsulate a reusable portion of an application. 

    invoking the New gallery from application navigator
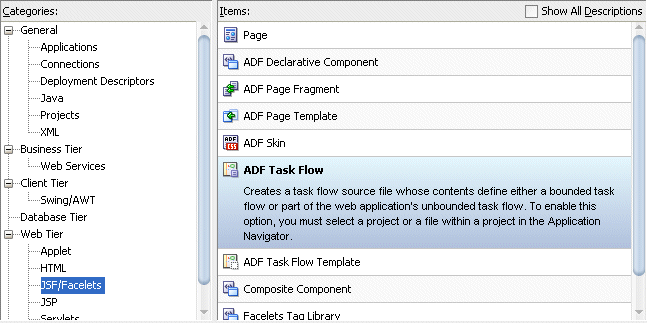
  2. In the New Gallery, click the Web Tier | JSF/Facelets node and select ADF Task Flow.
    new gallery with adf task flow selected
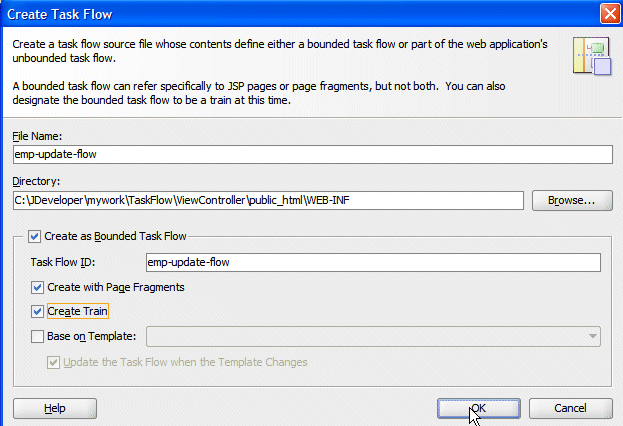
  3. In the Create Task Flow dialog, type emp-update-flow as the File Name. Select the following checkboxes.

    Then click OK.
    Property Value
    Create as Bounded Task Flow Checked
    Create with Page Fragments Checked
    Create Train Checked
    namning the task flow
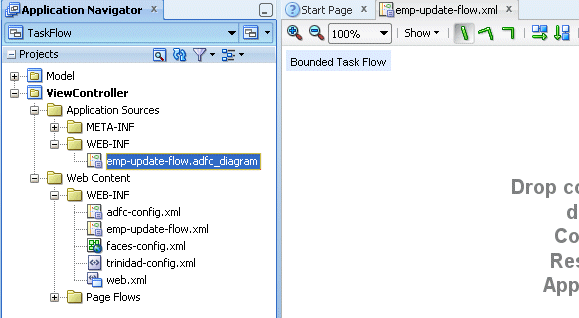
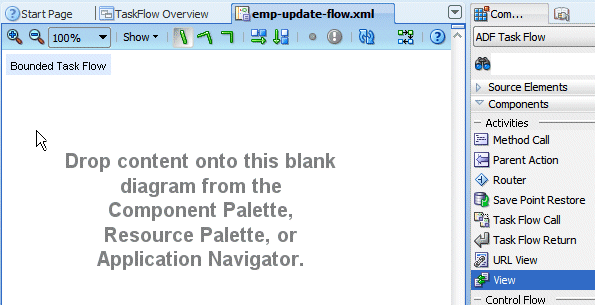
  4. A new empty task flow diagram displays and a new entry is created in the Application Navigator.
    navigator and blank task flow diagram
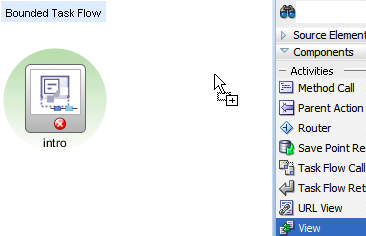
  5. Select the View component View icon from the Component Palette and drag and drop it onto the diagram surface.


    The primary type of task flow activity is a view, which displays a JSF page or page fragment. .

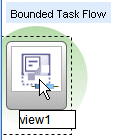
    creating a new view on the diagram
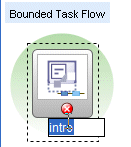
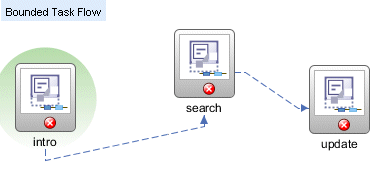
  6. Change the default name to intro.
    view on the diagramrenaming view to 'intro'
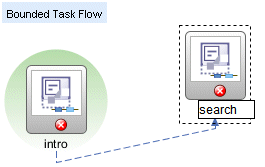
  7. Create a new view View icon on the diagram next to the intro one.
    creating second view on diagram

    Rename it search.
    renaming view to search
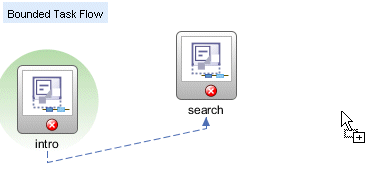
  8. Create a third view view icon on the diagram.
    create a third view on diagram

    Rename it update. Your diagram should look similar to the image below.
    renaming third flow 'update'
  9. Save all your work.

Wednesday 4 May 2016

Programatic handle to ADF Query Component

Programatic handle to ADF Query Component - see Query Input values


You can create ADF Query search forms that will allow users to search based on some input fields. The results of the query can be displayed as ADF Table , form or any other ADF UI Component . In general search forms are based on af:query and af:quickquery components.


ADF Search forms are based on view criteria defined at ADF VO level or implicit view criteria defined by the framework . Once you define the View criteria ,drag and drop it from the data control palette on the the page as ADF Query pane with table . ADF will take care of the rest of the things. Everything will be configured on its own ranging from search button binding  to the particular model and to the table which is being refreshed whenever results are being fetched .

Suppose we may want to modify the query values / see the current query values / validate the user input . we will see how to get handle to the ADF Query component to do this .


you will see the ADF:Query pane code in the page like this :

<af:query id="qryId1" headerText="Search" disclosed="true"
value="#{bindings.VOCriteriaQuery.queryDescriptor}" 
model="#{bindings.VOCriteriaQuery.queryModel}" queryListener="#{bindings.VOCriteriaQuery.processQuery}" 
queryOperationListener="#{bindings.VOCriteriaQuery.processQueryOperation}" resultComponentId="::resId1"/> 

queryListener having an expression that deals with invoking of corresponding binding dynamically. In order to get handle to this component we will write our custom method and bind it to the queryListener.

After modifying it looks like queryListener="#{backingBeanScope.managedBean1.onSearch}"

 The Below custom method will tell you everything in clear

  public void onSearch(QueryEvent queryEvent) {
       
        String EmployeeId = null;
        // Query Event is delivered when a query action is triggered
        QueryDescriptor qd = queryEvent.getDescriptor();
       
        // This line will represent group of criterion objects
        ConjunctionCriterion conCrit = qd.getConjunctionCriterion();
       
        //access the list of all search fields
        List<Criterion> criterionList = conCrit.getCriterionList();

        for (Criterion criterion : criterionList) {
            AttributeDescriptor attrDescriptor =  ((AttributeCriterion)criterion).getAttribute();

            if (attrDescriptor.getName().equalsIgnoreCase("EmployeeId")) { // EmployeeId is one of the query items in the search pane
             EmployeeId  =  (String)((AttributeCriterion)criterion).getValues().get(0);
             
            //This is how we will access the query field
             System.out.println("EmployeeId :" + EmployeeId );

            }
        }


        DCBindingContainer bc =
            (DCBindingContainer)BindingContext.getCurrent().getCurrentBindingsEntry();
        ViewCriteria vc = getViewCriteria(bc, qd);

    System.out.println("View Object"+ vc.getViewObject);

    //Execute the query Listener using EL. This will execute the query component .If u see the exp , this was initially applied to QueryListener.. Later we assigned QueryListener to our custom method.
     
   invokeMethodExpression("#{bindings.VOCriteriaQuery.processQuery}", queryEvent); 
       
    }
    
      //helper method to execute the QueryListener EL

       private void invokeMethodExpression(String expr, QueryEvent queryEvent) {
        FacesContext fctx = FacesContext.getCurrentInstance();
        ELContext elContext = fctx.getELContext();
        ExpressionFactory eFactory =
            fctx.getApplication().getExpressionFactory();
        MethodExpression mexpr =
            eFactory.createMethodExpression(elContext, expr, Object.class,
                                            new Class[] { QueryEvent.class });
        mexpr.invoke(elContext, new Object[] { queryEvent });
    }


    private ViewCriteria getViewCriteria(DCBindingContainer bc,
                                         QueryDescriptor qd) {

        Object execBinding =  bc.findExecutableBinding("VOCriteriaQuery"); // This will be seen in the page executable section as we have dropped for af:query
        ViewCriteria vc =
            JUSearchBindingCustomizer.getViewCriteria((DCBindingContainer)execBinding,
                                                      qd.getName());
        return vc;

    }

Saturday 30 April 2016

Select Many Checkbox LOV

ADF Select Many Listbox / Select Many Checkbox LOV


Few days back ,I was looking for an inbuilt feature of multi-select LOV in ADF and was quite surprised that ADF does not have this feature as a part of available LOV bindings.We cannot bind the LOV's to a selectManyListBox directly.To Achieve this we need to use a managed bean to dispatch between the ADF binding layer and the multi select component.The ADF selectManyListbox component allows the user to select many values from a list of items. It can contain any number of <f:selectitem>, <f:selectitems>, or <af:selectitem> components, each of which represents an available option that the user may select.

A typical ADF Multi select LOV looks like this :

<af:selectmanylistbox required="yes" value="#{bean.aValue}">
  <f:selectitem itemlabel="Option1" itemvalue="1">
  <f:selectitem itemlabel="Option1" itemvalue="2">
</f:selectitem></f:selectitem></af:selectmanylistbox>


Step 1 :

 1) Prepare a List of items that your Multi select LOV holds in a Managed Bean.The SelectManyListbox and -Choice value property writes/reads its value to/from a List (e.g. ArrayList)

private List<selectitem> actualList;
       public MultiSelect() {

        super();

        actualList = new ArrayList<selectitem>();
        actualList.add(new SelectItem("ACTIVE", "ACTIVE"));
        actualList.add(new SelectItem("INACTIVE", "INACTIVE"));
        actualList.add(new SelectItem("COMPLETED", "COMPLETED"));

2)
Drag and drop the selectManyListbox component from Jdev Component palette on to the page and bind it to the list created above from managed bean. After creating list it should look like below code .Also create an another list with getters and setters in the managed bean and bind to the value property of af:selectManyListbox manually.

  <af:selectManyListbox label="Label 1" id="sml1"
                              value="#{backingBeanScope.MultiSelect.lovValue}">
          <f:selectItems
                         id="si2"
                         value="#{backingBeanScope.MultiSelect.actualList}"/>
  </af:selectManyListbox>


private List<selectitem> lovValue;
    public void setLovValue(List<selectitem> lovValue) {
     
        this.lovValue = lovValue;
    }

    public List<selectitem> getLovValue() {
      
      
     return lovValue;
    }

  Input screen :


After checking the required value click the commandbutton and in the jdev console you will see the output like this

Selected Value:ACTIVE
Selected Value:COMPLETED
All you need to do is when the getter is called you make sure the data is read from where it is created .when you write back take the list transform its entries in to the way you want. some may want to create comma delimited list of string,semi-colon separated ,individual strings which they want to store in DB .

ADF currently doesn't support binding the selectManyListBox value to the VO attribute directly this is the approach that I have followed as workaround!!

Wednesday 27 April 2016

ADF ViewLink

ADF ViewLink - Cardinality & Accessor

Oracle ADF view links are business components that defines a relationship between two ADF view objects . when we say relationship between two ADF view objects and it is obvious it can be used in Master-Detail data representation .
In general view objects contains query that queries the database and view link will relate those queries using where clause.

For ex :  you want to render  employees based on department as a master - child ..


View Link = DepartmentsVO --> EmployeesVO

select DepartmentId from DepartmentsVO and DepartmentId from EmployeesVO and the click Add . Let cardinality be 1 to * [ Means : One department can contain many employees ] This cardinality will have an impact in the accessor generation .

In the next step


Generate Accessor :

 By default Destination Accessor , In View Object  : DepartmentsVO check box ll be selected . we will check the In View Object  : Employees VO in the Source Accessor.  This will add some code in both the VO Row Impl class .

 DepartmentsVO :

    public RowIterator getEmployeesVO() {
        return (RowIterator)getAttributeInternal(EMPLOYEESVO);
    }


Employees VO :

    public Row getDepartmentsVO() {
        return (Row)getAttributeInternal(DEPARTMENTSVO);
    }


The cardinality is 1 to * [1 to Many ] so ideally a department can be able to get all employees in it and tats why it has an accessor defined in its  DepVORowImpl class with return type Row Iterator . And the accessor in EmpVORowImpl will return a single row (as an employee can be in only one dept )

If the cardinality is 1 to 1  > Both the class will have a return type Row as it says 1 to 1 .
you can use these methods as Groovy expressions to get values in the ADF BC attribute level and in AM Impl class..


Monday 25 April 2016

Insert Rows in to ADF View Object Programatically

Insert Rows in to ADF View Object Programatically

Following are the use cases pertaining to this topic

1. Insert Rows into ADF View Object Programatically.
2. Insert Rows into a ADF View Object from a ADF Table which is a combination of multiple tables (for example : ADF Table in the jsp page contains mixture of columns from various tables and we need to take only some column data and save it in target ADF VO.

Create a View object from multiple entities (( Assuming you have a View Object SourceVO1 ).Drag and drop the View Object data control on to the page as ADF Table.Create an ADF button at the bottom of the table. Create Action Listener for the button. you must have the target View Object ready to store the values. Since you have created ADF Table on the page the binding section will have the bindings created for the View Object and to access its collection model .For more on bindings section ADF Bindings. Now we need to add the target View Object to the page bindings section.

This part of the section also describes about How to Create Tree Table binding.
Go to the Bindings section of your page. Click Plus icon

 Select tree from the Insert Item window and click ok.


Click Add button as shown . This will list all of the View Objects added to the Application Module

 Choose the desire View Object in which you are going to save the records.


Click at the plus icon and select Add Rule .


This window will bring down all of the attributes that target view object has.you can shuttle the necessary attributes to the righter side and click ok . Now the Target View Object added as Tree binding can be seen under Bindings section.


Now we will write the java code to insert rows. As we have already created an Action Listener for the button,go to the method of that java class and write this code.

//Code to get the bindings for TargetVO :
    
         DCBindingContainer bindings2 =
            (DCBindingContainer)BindingContext.getCurrent().getCurrentBindingsEntry();
             
        JUCtrlHierBinding obj = (JUCtrlHierBinding)bindings2.findCtrlBinding("ProgrammaticVO1");
        ViewObject targetVO = obj.getViewObject();
   DCBindingContainer bindings =
            (DCBindingContainer)BindingContext.getCurrent().getCurrentBindingsEntry();
        DCIteratorBinding empIter =
            bindings.findIteratorBinding("SourceVO1Iterator");
//SourceVO1Iterator is the iterator under Executables section for the SourceVO1 bindings.
        RowSetIterator roleRSIters = empIter.getRowSetIterator();
        RowSetIterator rs1 = roleRSIters.getRowSet().getViewObject().createRowSetIterator(null);
        NameValuePairs nvp = null;
        while (rs1.hasNext()) {
            Key key = rs1.next().getKey();
            Row r = rs1.getRow(key);           
           
            nvp = new NameValuePairs();
            nvp.setAttribute("Empid",r.getAttribute("EmployeeId"));
            nvp.setAttribute("Nameone",r.getAttribute("FirstName"));
            nvp.setAttribute("Nametwo",r.getAttribute("LastName"));
            targetVO.createAndInitRow(nvp);
         }
       
        rs1.closeRowSetIterator();
        targetVO.getApplicationModule().getTransaction().commit();

Getting the View object in MB and performing operations on it is not a good practice.

Saturday 23 April 2016

ADF Dynamic Region

ADF Dynamic Region | Working with Oracle ADF Dynamic Regions

ADF Region is used to render a bounded taskflow in a JSF page . The primary use of ADF Region is u can put  various pieces of application functionality in a bounded task flow. A single JSF page can contain many taskflows added as regions and each region may contain different content.


The sections pointed with arrows are different taskflows added as as a regions in a single JSF Page.The Taskflow which is added as ADF Region must contain at least one view activity.

Difference between ADF Region and Dynamic Region ?

Region added in a JSF Page can be invoked based on some action like button click or link that renders specific taskflow in which the region formed . various regions can also be displayed as a stand by at a time when the page loads.In Dynamic Region you do not need to drag and drop the required regions on to the JSF page instead your taskflows will be identified by using the taskflow ID on some action. The task flow binding dynamically determines the values of its ID at run time . In the above picture i have dragged and dropped four taskflows as a region in a JSF Page . But Dynamic Region simplifies this and allows us to swap between taskflows using Dynamic Region link where it store the task flow id in a managed bean and render the pages based on the task flow ID it gets at runtime .

Hope this gives you the basic idea on the concept and we will move ahead for creating one .


Create two taskflows :
AdfDemoApps\AdfDemoUi\public_html\WEB-INF\TaskFlows\CountriesFlow.xml,
AdfDemoApps\AdfDemoUi\public_html\WEB-INF\TaskFlows\EmployeesFlow.xml

Create two page fragments :
AdfDemoApps\AdfDemoUi\public_html\pages\CountriesRegionPage.jsff
AdfDemoApps\AdfDemoUi\public_html\pages\EmpRegionPage.jsff


Drag & drop the CountriesRegionPage.jsff in CountriesFlow.xml and  EmpRegionPage.jsff in EmployeesFlow.xml.We need a jsp page to run these taskflows. Create a JSF Page DynamicRegionMain.jspx under AdfDemoApps\AdfDemoUi\public_html\pages. In the Create JSF Page dialog under Initial Page Layout and Content section i have selected Oracle Three Column Layout for the rich look and to split the user screen into two so that we can have action links at one side and actual pages at other side.

Now Drag and drop the EmployeesFlow.xml into the DyamicRegionMain.jspx we just created and select Dynamic Region. In the Next step it will ask you to specify Managed Bean . Click Add symbol  and create one .  Bean name is DynamicRegionBean under package bean and click ok. you can also create managed bean separately and  choose from the drop down. click ok in the Edit Task Flow Binding dialog.


The next two steps are important

Drag and drop the EmployeesFlow.xml  in the left panel of the page and choose Dynamic Region Link > dynamicRegion1.
Drag and drop the CountriesFlow.xml  in the left panel of the page and choose Dynamic Region Link > dynamicRegion1.
As we already have one Dynamic Region we are appending our taskflows to the same region link .

When you drop a taskflow onto a JSF page to create an ADF dynamic region , JDeveloper adds an af:region tag to the page . This tag contains a reference to a task flow binding

<f:facet name="center">
            <af:region value="#{bindings.dynamicRegion1.regionModel}" id="r1"
                       partialTriggers="::cl1 ::cl2"/>
 </f:facet>


An ADF dynamic region link swaps the taskflows within an ADF dynamic region . Look at the below code snippet in the DynamicRegionBean. java

Jspx :

     <af:commandLink text="EmployeesFlow"
                              action="#{viewScope.DynamicRegionBean.employeesFlow}"
                              id="cl1"/>
              <af:spacer width="10" height="10" id="s1"/>
      <af:commandLink text="CountriesFlow"
                              action="#{viewScope.DynamicRegionBean.countriesFlow}"
                              id="cl2"/>
Bean :

    private String taskFlowId =
        "/WEB-INF/TaskFlows/EmployeesFlow.xml#EmployeesFlow";

    public DynamicRegionBean() {

        super();

    }

    public TaskFlowId getDynamicTaskFlowId() {

        return TaskFlowId.parse(taskFlowId);
    }

    public String employeesFlow() {

        taskFlowId = "/WEB-INF/TaskFlows/EmployeesFlow.xml#EmployeesFlow";
        return null;
    }

    public String countriesFlow() {

        taskFlowId = "/WEB-INF/TaskFlows/CountriesFlow.xml#CountriesFlow";
        return null;
    }

The Managed bean stores the value of the task flow ID that displays inside the dynamic region
when a user click on any link its corresponding method will be called and thus taskFlowId will be changed and corresponding page will be rendered.

Note :
you can add an ADF Dynamic Region Link if you already have at least one ADF Dynamic Region on a page. a menu displays all of the dynamic regions currently on the page

Save All .  Right Click on DynamicRegionMain.jspx and choose Run . The Output

Thursday 21 April 2016

Create a ADF Page and Use the Data Controls Panel

What Happens When You Create a ADF Page and Use the Data Controls Panel : ADF Insight View


It is not over when it comes to ADF View Controller .You created a page , it runs and you enjoy seeing the output .The Fact is ADF creates a lot of XML files for each file you create and all files have reference to it . If any of these files are misplaced or removed then you will have tough time to debug and you will end up creating the project again .  so in the way , i will tell you about what are the files will be created and updated when you create a jsf page fragment , jspx page and using a data control to bring up the populated data.

Before starting, have a look at this post how-to-create-oracle-adf-page . I will explain the concepts based on the post so that it will be useful to understand

DataBindings.cpx

what is Page Definition file ?

when you create jsp file and drop a data control on to  a page , ADF View controller creates another file called PageDef.xml to store all the bindings , collection model it uses and the iterator defined.


Suppose in our case we dropped  employees data control on the sample page . Now when we look at the PageDef.xml there are three tabs for various purposed defined . Bindings section contains the Data control we used to drag and drop from the Data Control panel. here it is EmployeesVO1 .  Executables part contains the iterators for the Bindings we added . Every iterator refers a VO instance (i.e a collection) corresponding to its bindings .  The EmployeesVO1 uses EmployeesVO1Iterator to loop the data and print in the page .( for ex : when we have a java arraylist that contains data and we use iterator to loop and print it accordingly. The real use will be like this in a page #{bindings.EmployeesVO1Iterator.estimatedRowCount})
You can even create a new ADF binding on the fly and make use of it through EL.

Source code for the SamplePageDef.xml

<?xml version="1.0" encoding="UTF-8" ?>
<pageDefinition xmlns="http://xmlns.oracle.com/adfm/uimodel"
                version="11.1.1.61.92" id="SamplePageDef" Package="pages">
  <parameters/>
  <executables>
    <variableIterator id="variables"/>
    <iterator Binds="EmployeesVO1" RangeSize="25"
              DataControl="AppModuleDataControl" id="EmployeesVO1Iterator"/>
  </executables>
  <bindings>
    <tree IterBinding="EmployeesVO1Iterator" id="EmployeesVO1">
      <nodeDefinition DefName="model.view.EmployeesVO" Name="EmployeesVO10">
        <AttrNames>
          <Item Value="CommissionPct"/>
          <Item Value="DepartmentId"/>
          <Item Value="Email"/>
          <Item Value="EmployeeId"/>
          <Item Value="FirstName"/>
          <Item Value="HireDate"/>
          <Item Value="JobId"/>
          <Item Value="LastName"/>
          <Item Value="ManagerId"/>
          <Item Value="PhoneNumber"/>
          <Item Value="Salary"/>
        </AttrNames>
      </nodeDefinition>
    </tree>
  </bindings>
</pageDefinition>


Now lets talk about DataBindings.cpx .


This file will be created when you create any page first time in the ADF View Controller project . This file will contains the pages you create in the ADF view controller project .  It has Page Mappings , Page Definition Usages, Data Control Usages .Page Mappings contains two sections path and usageId. Path is the location of the file in contextual path . Page Definition Usages contains the Id and path for the binding file created for a jsf or jsp page .  Data Control Usages contains the application modules

Source Code for DataBindings.cpx

<?xml version="1.0" encoding="UTF-8" ?>
<Application xmlns="http://xmlns.oracle.com/adfm/application"
             version="11.1.1.60.13" id="DataBindings" SeparateXMLFiles="false"
             Package="view" ClientType="Generic">
  <pageMap>
    <page path="/pages/Sample.jspx" usageId="view_SamplePageDef"/>
  </pageMap>
  <pageDefinitionUsages>
    <page id="view_SamplePageDef" path="pages.SamplePageDef"/>
  </pageDefinitionUsages>
  <dataControlUsages>
    <BC4JDataControl id="AppModuleDataControl" Package="model.applicationmodule"
                     FactoryClass="oracle.adf.model.bc4j.DataControlFactoryImpl"
                     SupportsTransactions="true" SupportsFindMode="true"
                     SupportsRangesize="true" SupportsResetState="true"
                     SupportsSortCollection="true"
                     Configuration="AppModuleLocal" syncMode="Immediate"
                     xmlns="http://xmlns.oracle.com/adfm/datacontrol"/>
  </dataControlUsages>
</Application>


How the  Data is being fetched and displayed in the page using ADF bindings ?

After we create a ADF Table dropping a Data Control on the jsp page, binding section identifies the corresponding collection model associated with it and creates the iterator. Once it is done it loops through the data collection using iterator and displays the data accordingly. Look at the sample code below

<af:table value="#{bindings.EmployeesVO1.collectionModel}" var="row"
                  rows="#{bindings.EmployeesVO1.rangeSize}"
                  emptyText="#{bindings.EmployeesVO1.viewable ? 'No data to display.' : 'Access Denied.'}"
                  fetchSize="#{bindings.EmployeesVO1.rangeSize}"
                  rowBandingInterval="0" id="t1">
    <af:column sortProperty="CommissionPct" sortable="true"
                     headerText="#{bindings.EmployeesVO1.hints.CommissionPct.label}"
                     id="c2">
            <af:outputText value="#{row.CommissionPct}" id="ot2">
              <af:convertNumber groupingUsed="false"
                                pattern="#{bindings.EmployeesVO1.hints.CommissionPct.format}"/>
            </af:outputText>
          </af:column>
</af:table >

you get a row property to uniquely identify a row representation data and access its columns data